Scaling Digital Images
Scaling of digital images is subject to the same problems that come with and without antialiasing. Rasterized digital images are composed of a mosaic of little square pixels. When you resize an image, a computer will create a new mosaic of pixels based on the previous one. There are several methods that a computer can use to do this, which have slightly different results.
Interpolation is the process of doing this resizing, and of choosing what colors should go into the new pixel mosaic. When scaling an image to larger size, there will be more pixels present; there will be cases where there are now two pixels where there was one before. When scaling an image to a smaller size, there will now be pixels saddled with the task of representing the same colors that more than one pixel did before.
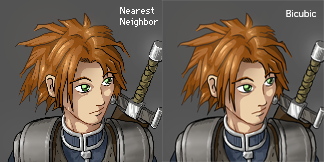
Nearest Neighbor interpolation, sometimes called a lack of interpolation altogether, decides which color the new pixel will be based on a simple criterion. Imagine that instead of resizing the mosaic, that we were instead remaking the same thing at the exact same size, with many more (smaller) tiles - this would be analogous to scaling an image to a larger size. One way to do this would be to simply use the exact same color as whatever previous tile was closest to the new one you're putting in. In fact, you could simply break the old tiles into little pieces where they lay, and you'd get the same effect.
The problems with this are simple - if you are scaling up, the tiles don't blend in color any more than they used to, which wastes the presence of all those new tiles. The second problem is that if you are scaling to a smaller size, with less tiles, you will run into situations where two are being replaced by one. In theory, if you had a blue tile next to a red tile, it might make sense to replace the both of them by a single purple tile; however, you are forced by the "Nearest Neighbor" method to choose one of those two and remove the other entirely.
Bicubic interpolation, and Bilinear interpolation, do the blending I just talked about. There are many other methods which work something like these two, and when given a choice between them, always choose to use Bicubic Interpolation over Bilinear interpolation. It's simply better. It is very slightly slower, but this hasn't been an issue on personal computers for quite some time, and the continued availability of it is just a legacy of a time when computers were much worse than they are now.
This image illustrates the bad effects of downscaling with Nearest Neighbor filtering:

Side note: One of the problems with digital scaling is trying to scale to a larger size. A computer can scale any image to a smaller size without any problems, but to scale something to a larger size is difficult, because you're trying to fill in details that simply do not exist. Nearest neighbor filtering will produce hard, rectangular edging, bicubic will blur the space between the pixels. In certain rare instances, such as old-fashioned sprite art, special algorithms that follow the edges of similarly colored pixels can be used to better effect than either bicubic or nearest neighbor interpolation. These are often used in nintendo emulators. It should be noted, however, that these would be useless for wesnoth, because of how our sprite art is drawn.
Which Scaling to Use:
based on the type of art being scaled.
For sprite art, it is generally best to set your scaling method to "nearest neighbor." After scaling your image, you absolutely must retouch any misplaced pixels by hand, and I guarantee they will be present. Sprite art is very difficult to scale, because of the procedural nature of its construction. The smaller a piece of sprite art gets, the more important a single pixel and the arrangement of pixels becomes; thus it follows that any displacement of these can destroy the effect they had before.
For basically all other art, use the "Bicubic Interpolation." Be this photos, scanned drawings, cell-shaded art, anything.
How do I set this?
(Note that this describes the global setting. If, in any scale dialog box, there is another menu with the same thing in it, that sets the same thing, but only for that individual operation.)
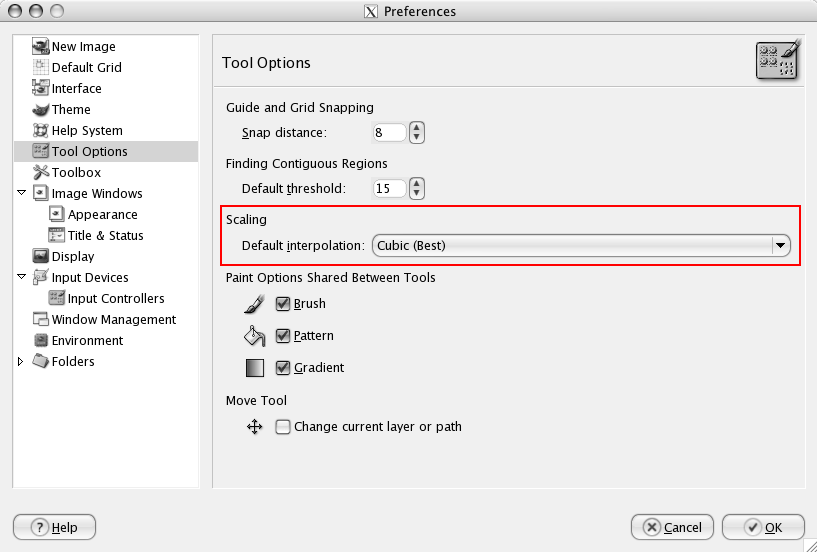
In the Gimp, you should find a panel in the preferences that looks a bit like this. The section outlined in red is the place you change this:

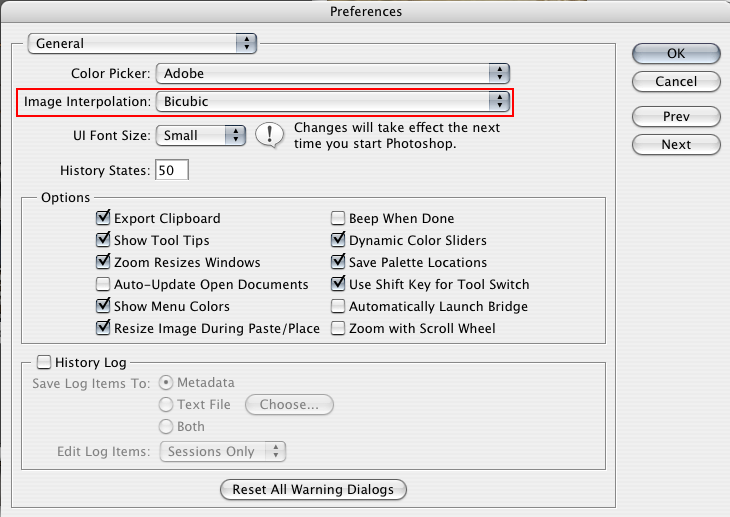
In photoshop, the following picture illustrates the same thing:
