How to anti-alias sprite art
Anti-aliasing is a technique designed to counter the inherent "grain" of computer displays, a grain that results from their cartesian nature. Despite early experiments with radically different display technologies, the computing industry settled on this display system of rectangularly arrayed pixels, and to effectively use it, some artists attempt overcome one of its greatest inherent limits. Anti-aliasing is designed to do just that.
The problem is this, when rendering a line, distances between drawn elements on a screen are not infinitesimal. You can only make a change to your image at fixed distances, specifically the true dpi resolution of your current display setting. As an aside, this is not to be confused with the display setting recognized by the operating system - macintosh screens were only 72dpi (dots per inch, lengthwise) on the original macintosh computers, though they have inherited that setting in name, it became meaningless with the advent of the first color screens. Likewise, though they pretend that they do, computers running windows very rarely have a monitor set to exactly 96dpi. Something near or above those is not uncommon these days, though.
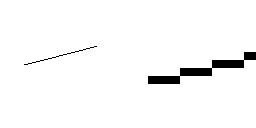
To render a solid line, you cannot simply place pixels (picture elements) in the target color, as you might when drawing with a pen on paper, because the granularity of them on the screen is so big that you can see the breaks between the rows. The result of drawing a solid black line on a white background, without antialiasing, will look like this:

Notice the rather garish and sudden shifts between pixel rows? These have many names, including the "jaggies", and many artists consider them to be an unnecessary evil.
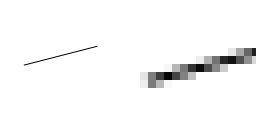
This is how much smoother the line looks if you anti-alias it:

Anti-aliasing copes with this by doing what any digital camera would do, in trying to decide what color a target pixel would be. Imagine the target pixel as a rectangular area of different colors that you have to represent by a single color. Imagine doing the same thing to a photograph. How would you go about this? By taking an average, that's how. If you were doing this to a photograph of the empty sky, you might pick a light blue color. When you are dealing with a line, you are dealing with a geometric object with width. You're not really drawing a line, you're drawing a solid rectangle. It's only in math that lines exist with no width - the lines you draw exist to pretend they are the "edges", the infinitely small exact points at which one thing starts and another ends.
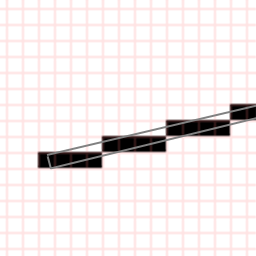
In doing pixel and sprite art, you assume that your lines are usually 1 pixel in width. To anti-alias, you, in your imagination, superimpose the line on a grid representing the real pixels you're drawing on to. If the real, geometric line that you are trying to represent covers up a pixel completely, that pixel is the color of the line. If the real, geometric line doesn't touch the pixel, the pixel gets no color from the line. If the line covers it up partly, which is most common, the final color gets mixed towards the color of the line by exact fraction of how much the line covers the pixel.

Covering it all the way gives a full 1/1, and it goes all the way to the line's color. Covering 1/2 of the way moves it half of the way to the color - if we have a black line on a white background, halfway between those two colors is a medium gray. Covering just a tiny corner of the pixel with the line will mix in just a little bit of the line's color into the pixel - for the example we've been using this whole time, it'd end up a very light grey.
Applications to sprite art:
Anti-aliasing is how you make anything that is not a vertical or horizontal edge look good. You can get away with not doing anti-aliasing on many parts of your images, but if you do it some of the time, on the parts where it is most needed, it can make the image look much better. Anti-aliasing is often used on things like staves, or swords, when they hang at a slight angle rather than straight up or straight down.
- One really nice trick is that mixing colors by transparency works exactly the same way as the color mixing I described above - in fact, it's the exact same thing. If you anti-alias the edges of your units, where they interface with the terrain, they will look to have edges that follow the actual shape you intended, rather than being forced into a cartesian grid. You can create pixels along the edges of your units that are the same color as the edge, but with variable transparency. We can do this because, though we don't know what it's going to be mixed with, we do know how much of the unit's color to mix with the background, whatever that background is. It follows the same rules as those for the line I showed above. That "how much of the line's color" is the level of opacity. To do this, you will need a program which can actually work with transparency values, like Adobe Photoshop, or the free Gnu Image Manipulation Program (GIMP).
- One advanced way to have naturally anti-aliased lines is to draw your sprites with a paintbrush instead of the pencil tool. This is, however, a very difficult technique, and not something to be attempted unless you are a master at sprite art.