Variable-width strokes
Note: This tutorial was written for Inkscape, but should be applicable for other vector drawing programs with similar functionality.
In SVG the strokes are always constant in width. This is good for diagrams, but makes drawings look too formal and dull. Variable width outlines can be made with the calligraphy tool, but it requires a tablet and a relatively steady hand. The drawback of this kind of lines also is that if you decide to change the shape of the underlying colour flat, you have to redraw the outline.
Howerer, with a little trickery it's possible to create variable width outline easily for a path of any shape that behaves like the normal strokes, that is, when you change the shape of the path, the shape of the outline is updated as well.
The process is outlined in the image below:
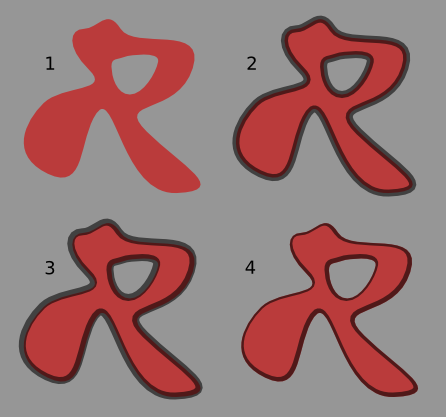
- Create your path with any tool you like. Set the stroke fill to none
- From "Path -> Linked Offset" create a path whose size (and shape) is linked to the original path, but do not change its size. Raise this path to the top, set its fill colour to none and the stroke colour to the desired value (here it is black with reduced opacity, so that it will always show as a darker shade of the flat colour). Set the stroke width to about the sum of thinnest and thickest lines you desire.
- Move the outline path slightly to the direction you want the thinnest parts of the outline to be (here it is moved left and up). The original path should stay completely within the outline path.
- Make a clone of the original path and use that as a clip path on the outline path. This will make invisible the parts of the outline path that lie outside the original path.
Now you have an outline that will adjust to any changes in the size or shape of the original path, and whose thickness is determined by the path normal. You can use gradient fills for the line and line styles, like dotted line etc., but remember that only the inside half of the line is visible (normal strokes lie half outside and half inside of the path).
The downside of this method is that the line thickness and shape are determined automatically and are not always exactly what you would want. To make the outline more editable, select it and first do "Path -> Object to Path" and then "Path -> Stroke to Path". The inner egde of the outline path is now a subpath that you can edit as you whish, but the line isn't linked to the original path anymore, and so doesn't keep up with any of its major changes. It's still clipped by the clone of the original path, so it will adjust to small tweakings.