Difference between revisions of "MultiHexTutorial"
(lede) |
|||
| (One intermediate revision by one other user not shown) | |||
| Line 1: | Line 1: | ||
| + | This is a tutorial having to do with the [[TerrainGraphicsWML|Terrain Graphics]] system. | ||
| + | |||
(quickly written, I'll explain it more in detail when I have more time -- Ayin) | (quickly written, I'll explain it more in detail when I have more time -- Ayin) | ||
| Line 15: | Line 17: | ||
We will use the following three rules to fill the mountains. Beware: '''Spaces into maps do matter!''' | We will use the following three rules to fill the mountains. Beware: '''Spaces into maps do matter!''' | ||
| − | + | <syntaxhighlight lang=wml> | |
| − | + | [terrain_graphics] | |
| − | + | map=" | |
| − | + | . , 1 | |
| − | + | , . | |
| − | + | . , 1 | |
| − | + | , . | |
| − | + | . , 1 | |
| − | + | , 1 | |
| − | + | 1" | |
| − | + | [tile] | |
| − | + | pos=1 | |
| − | + | type=Mm | |
| − | + | [/tile] | |
| − | + | probability=30 | |
| − | + | no_flag="base" | |
| − | + | set_flag="base" | |
| − | + | [image] | |
| − | + | layer=-1000 | |
| − | + | name=tile5 | |
| − | + | [/image] | |
| − | + | [/terrain_graphics] | |
| − | |||
| − | |||
| − | |||
| − | |||
| − | |||
| − | |||
| − | |||
| − | |||
| − | |||
| − | |||
| − | |||
| − | + | [terrain_graphics] | |
| − | + | map=" | |
| − | + | . | |
| − | + | , 1 | |
| − | + | 1" | |
| − | + | [tile] | |
| − | + | pos=1 | |
| − | + | type=Mm | |
| + | [/tile] | ||
| + | probability=30 | ||
| + | no_flag="base" | ||
| + | set_flag="base" | ||
| + | [image] | ||
| + | layer=-1000 | ||
| + | name=tile2 | ||
| + | [/image] | ||
| + | [/terrain_graphics] | ||
| − | + | [terrain_graphics] | |
| − | + | [tile] | |
| − | + | x=0 | |
| − | + | y=0 | |
| − | + | type=Mm | |
| − | + | [/tile] | |
| − | + | probability=100 | |
| − | + | no_flag="base" | |
| − | + | set_flag="base" | |
| − | + | [image] | |
| − | + | layer=-1000 | |
| − | + | name=tile1 | |
| − | + | [/image] | |
| − | + | [/terrain_graphics] | |
| + | </syntaxhighlight> | ||
The first rule, regarding the biggest mountains, will apply first. It will include, with 30% probability, the big | The first rule, regarding the biggest mountains, will apply first. It will include, with 30% probability, the big | ||
Latest revision as of 03:41, 8 May 2023
This is a tutorial having to do with the Terrain Graphics system.
(quickly written, I'll explain it more in detail when I have more time -- Ayin)
First example: mountains
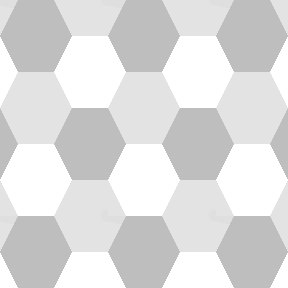
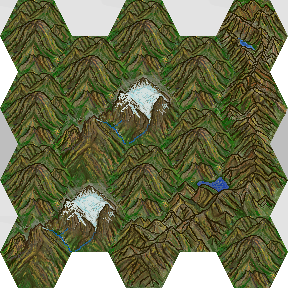
Suppose we have the following map to fill with mountain tiles:
And we have the following images to fill it:
- tile1:

- tile2:
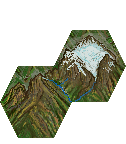
- tile5:

We will use the following three rules to fill the mountains. Beware: Spaces into maps do matter!
[terrain_graphics]
        map="
.  ,  1
,  .
.  ,  1
,  .
.  ,  1
,  1
1"
        [tile]
                pos=1
                type=Mm
        [/tile]
        probability=30
        no_flag="base"
        set_flag="base"
        [image]
                layer=-1000
                name=tile5
        [/image]
[/terrain_graphics]

[terrain_graphics]
        map="
.
,  1
1"
        [tile]
                pos=1
                type=Mm
        [/tile]
        probability=30
        no_flag="base"
        set_flag="base"
        [image]
                layer=-1000
                name=tile2
        [/image]
[/terrain_graphics]

[terrain_graphics]
        [tile]
                x=0
                y=0
                type=Mm
        [/tile]
        probability=100
        no_flag="base"
        set_flag="base"
        [image]
                layer=-1000
                name=tile1
        [/image]
[/terrain_graphics]
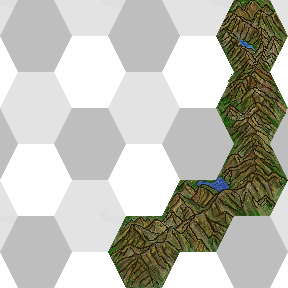
The first rule, regarding the biggest mountains, will apply first. It will include, with 30% probability, the big 5-tile mountain range. This will make, for example, something like this.
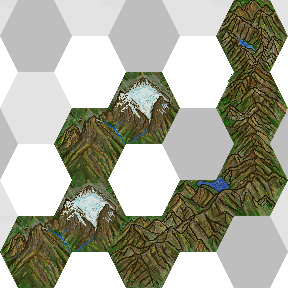
The second rule will then apply. Note that the previous rule had set the "built-m" flag, thus preventing the mountains from the second rule to overlap the place where the first mountains already have been placed. The result will be something like that:
The, the last rule, with 100% probability (the probability key could have been omitted) will apply. It will place a mountain tile on the places where no other mountain tile was placed. The final mountain range will look like that:
Village with a tower
To add a building with a tower that spans over 2 hexes, you may use the following rule (Tt being the character representing the building hex)
[terrain_graphics]
     map="*, 1"
     [tile]
         pos=1
         type=Tt
     [/tile]
     [image]
         name=tower # a 36x72 image
         position=vertical
         base=36,108
     [/image]
[/terrain_graphics]
Reference
Map:
'.' means "this rule does not apply to this hex" (i.e: no image will be set to this hex, this hex will not be checked for flags, etc).
'*' means "this rule applies to this hex, but this hex can be any terrain type".
Flags:
no_flag="built-m" means that the rule only matches if the flag "built-m" is not set.
set_flag="built-m" means that the rule, upon matching, sets the flag "built-m".