Difference between revisions of "Z-order tricks"
Sgt. Groovy (talk | contribs) |
|||
| Line 9: | Line 9: | ||
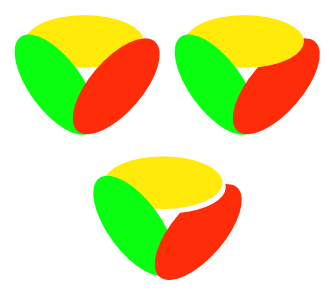
In the image below we have an illustration of the problem. We want three ellipses of different colours stacked circularily as in top right, but with a linear z-order, the top left is best we can do. We can't put the red ellipse under the yellow one without putting it also below the green one, because that is on top of the yellow. | In the image below we have an illustration of the problem. We want three ellipses of different colours stacked circularily as in top right, but with a linear z-order, the top left is best we can do. We can't put the red ellipse under the yellow one without putting it also below the green one, because that is on top of the yellow. | ||
| − | http:// | + | http://wesnoth.org/wiki-images/z-tricks/burgshot13.png |
In order to achieve the desired effect, we need to cut off a piece out of the red ellipse that corresponds to the part that would be under the yellow one. To do this, you will first select the yellow ellipse, do "Edit -> Copy" and "Edit -> Paste in place." This will result in a copy of the yellow ellipse in exactly the same place. Then select both the copy and the the red one, and do "Path -> Difference", which will remove from the red ellipse the area overlapping the yellow one. In the bottom image is a copy of of the ellipses, with the red one moved outwards to show how it's shape is changed. This also demonstrates the drawback of the method: After you have matched the edges, you can't move the paths in relation to each other without breaking the alignement. | In order to achieve the desired effect, we need to cut off a piece out of the red ellipse that corresponds to the part that would be under the yellow one. To do this, you will first select the yellow ellipse, do "Edit -> Copy" and "Edit -> Paste in place." This will result in a copy of the yellow ellipse in exactly the same place. Then select both the copy and the the red one, and do "Path -> Difference", which will remove from the red ellipse the area overlapping the yellow one. In the bottom image is a copy of of the ellipses, with the red one moved outwards to show how it's shape is changed. This also demonstrates the drawback of the method: After you have matched the edges, you can't move the paths in relation to each other without breaking the alignement. | ||
| Line 19: | Line 19: | ||
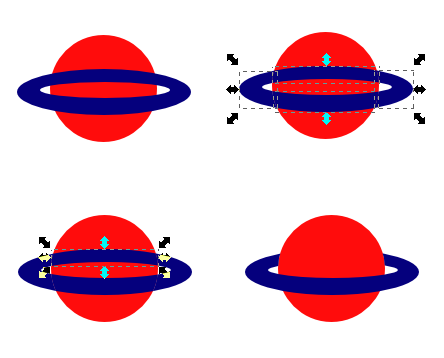
Let's now look at one more, a bit trickier case. Sometimes you can have a circular z-order between ''two'' objects. A good example is Saturn and it's rings, coming from behind the planet and then going over it. We see it in the image below, bottom right is our goal, and top left are the original paths, created with the ellipse tool (now you should already know how to cut the "hole" in the blue one). | Let's now look at one more, a bit trickier case. Sometimes you can have a circular z-order between ''two'' objects. A good example is Saturn and it's rings, coming from behind the planet and then going over it. We see it in the image below, bottom right is our goal, and top left are the original paths, created with the ellipse tool (now you should already know how to cut the "hole" in the blue one). | ||
| − | http:// | + | http://wesnoth.org/wiki-images/z-tricks/burgshot5.png |
We know that we can use a copy of the red path to cut off the part of the blue one that should be eclipsed, but how do we do that without cutting off the part that is supposed to eclipse the red path? First make "Edit -> copy" and "Edit -> Paste in place" for the red path and select this copy and the blue path. But then, instead of the "Path -> Difference" do "Path -> Division", which will cut the blue path into several paths along the red path's edge, but leave them all in place (top right). One of the parts corresponds to the section that should be covered by the red path (bottom left). Select this path and delete it. The remaining paths now make up the part that should be visible, but it is still divided into separate paths. Select them all and do "Path -> Union," which will fuse them back into one path again. | We know that we can use a copy of the red path to cut off the part of the blue one that should be eclipsed, but how do we do that without cutting off the part that is supposed to eclipse the red path? First make "Edit -> copy" and "Edit -> Paste in place" for the red path and select this copy and the blue path. But then, instead of the "Path -> Difference" do "Path -> Division", which will cut the blue path into several paths along the red path's edge, but leave them all in place (top right). One of the parts corresponds to the section that should be covered by the red path (bottom left). Select this path and delete it. The remaining paths now make up the part that should be visible, but it is still divided into separate paths. Select them all and do "Path -> Union," which will fuse them back into one path again. | ||
[[Category: Art Tutorials]] | [[Category: Art Tutorials]] | ||
Latest revision as of 08:31, 8 April 2014
Note: This tutorial was written for Inkscape, but should be applicable for other vector drawing programs with similar functionality.
In a vector image, every object (path, rectangle, piece of text, etc) has a position in the x-y plane, but it also has a position in the depth dimension. If you think the objects as paper cut-outs, any time two of them overlap, one must be on top of the other. Similarily, each object in a vector image occupy a slot in the z-order, which dictates which object appears on top of which (the difference to paper cut-outs is that they retain their z-position even when they are not overlapping in x-y space). You can always rearrange the z-order of your objects, within certain limits. For example, when you group objects, they retain their relative z-order to each other, but no object outside the group can occupy a z-slot between the ingroup objects.
You can use the z-ordering to you advantage, when you want areas of different colour to appear next to each other without a gap in between. As with paper cut-outs, the simplest way to do this is just to make one area to expand a bit under the other. This has the benefit that you can later adjust the positions of the paths without a gap appearing.
This approach is not possible in all situations, however. One common situation is where you have objects with a circular z-order: Object A covering part of object B, which covers part of object C, which in turn covers part of object A. In a vector image, the z-order is always linear, and to achieve the appearance of circular z-order, we need some trickery, the tools for wich are found in the Path menu.
In the image below we have an illustration of the problem. We want three ellipses of different colours stacked circularily as in top right, but with a linear z-order, the top left is best we can do. We can't put the red ellipse under the yellow one without putting it also below the green one, because that is on top of the yellow.

In order to achieve the desired effect, we need to cut off a piece out of the red ellipse that corresponds to the part that would be under the yellow one. To do this, you will first select the yellow ellipse, do "Edit -> Copy" and "Edit -> Paste in place." This will result in a copy of the yellow ellipse in exactly the same place. Then select both the copy and the the red one, and do "Path -> Difference", which will remove from the red ellipse the area overlapping the yellow one. In the bottom image is a copy of of the ellipses, with the red one moved outwards to show how it's shape is changed. This also demonstrates the drawback of the method: After you have matched the edges, you can't move the paths in relation to each other without breaking the alignement.
There is another, a bit more complex way to do this operation, which will allow the paths to be edited or moved without breaking the alignment. First select the red path and make "Path -> Linked Offset", creating a copy of that will change when the original is changed. Raise it to the top and change its fill colour to white. Do the same for the yellow path, but change its colour to black. Select both linked offsets and group them. Select both the group and the red path, and do "Object -> Mask -> Set." After this operation the red path is masked with its own linked copy in white, combined a linked copy of the yellow path in black. The result is that the red path is always invisible where it overlaps the yellow one. You can edit the nodes of either path, and the mask is updated as well. You should note, however, that when a masked object is transformed (moved, scaled, etc.), the transformation is also applied to the mask, which is not desireable in our case. So if you want to do transformations on the red path, disable the mask first, do the transformation and reapply the mask (you can move it in node editing mode without this hassle, though, by simply selecting all the nodes).
Here is a summary of the path operations and how they work. They can be incredibly powerful once you learn how to use them creatively.
Let's now look at one more, a bit trickier case. Sometimes you can have a circular z-order between two objects. A good example is Saturn and it's rings, coming from behind the planet and then going over it. We see it in the image below, bottom right is our goal, and top left are the original paths, created with the ellipse tool (now you should already know how to cut the "hole" in the blue one).

We know that we can use a copy of the red path to cut off the part of the blue one that should be eclipsed, but how do we do that without cutting off the part that is supposed to eclipse the red path? First make "Edit -> copy" and "Edit -> Paste in place" for the red path and select this copy and the blue path. But then, instead of the "Path -> Difference" do "Path -> Division", which will cut the blue path into several paths along the red path's edge, but leave them all in place (top right). One of the parts corresponds to the section that should be covered by the red path (bottom left). Select this path and delete it. The remaining paths now make up the part that should be visible, but it is still divided into separate paths. Select them all and do "Path -> Union," which will fuse them back into one path again.