Difference between revisions of "Shaped gradients with Gaussian blur"
m |
|||
| Line 5: | Line 5: | ||
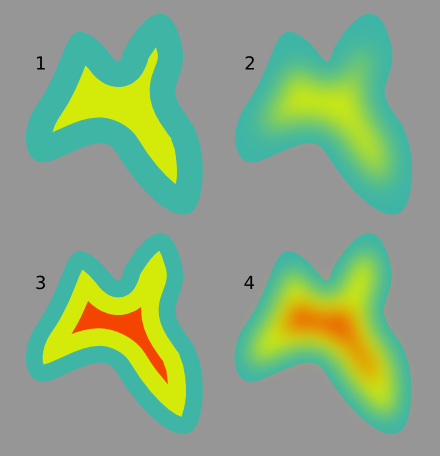
To make a "radial" gradient of any shape, that is, a gradient that changes from the edge of the path toward the centre, first create the path and set its fill colour to what you want the outer colour to be. Then make "Path -> Linked Offset", raise it to the top and set it to the inner colour (or usually somewhat more saturated one, to compensate the mixing when blurred). Use the node handle to make it smaller than the original path (1) and blur it to create the gradient (2). Because the inner path is linked to the outer one, any changes to the outer path will be updated in the shape of the inner one (though you may need to readjust the blur radius if you change the shape radically). To make multi-stop gradient, simply make several linked offsets of different colours and sizes (3). You will notice that the colour transition is smoother (rounder) than in normal gradients. If you need more linear gradient, you need to make several intermediary (in size and colour) linked offset paths. | To make a "radial" gradient of any shape, that is, a gradient that changes from the edge of the path toward the centre, first create the path and set its fill colour to what you want the outer colour to be. Then make "Path -> Linked Offset", raise it to the top and set it to the inner colour (or usually somewhat more saturated one, to compensate the mixing when blurred). Use the node handle to make it smaller than the original path (1) and blur it to create the gradient (2). Because the inner path is linked to the outer one, any changes to the outer path will be updated in the shape of the inner one (though you may need to readjust the blur radius if you change the shape radically). To make multi-stop gradient, simply make several linked offsets of different colours and sizes (3). You will notice that the colour transition is smoother (rounder) than in normal gradients. If you need more linear gradient, you need to make several intermediary (in size and colour) linked offset paths. | ||
| − | http:// | + | http://wesnoth.org/wiki-images/gradients-gaussian/tutorial2.png |
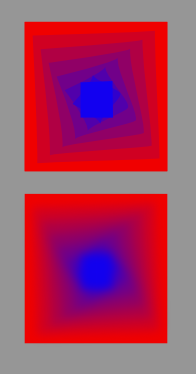
The same method is good for making any odd-shaped gradients. Just create a stepwise gradient with several paths and blur them to make the gradient smooth. In the image below there is a stepwise gradient created with the interpolate effect (this effect is especially handy for this, because it can interpolate the colour as well). In the lower image all but the outermost path have been blurred. | The same method is good for making any odd-shaped gradients. Just create a stepwise gradient with several paths and blur them to make the gradient smooth. In the image below there is a stepwise gradient created with the interpolate effect (this effect is especially handy for this, because it can interpolate the colour as well). In the lower image all but the outermost path have been blurred. | ||
| − | http:// | + | http://wesnoth.org/wiki-images/gradients-gaussian/tutorial3.png |
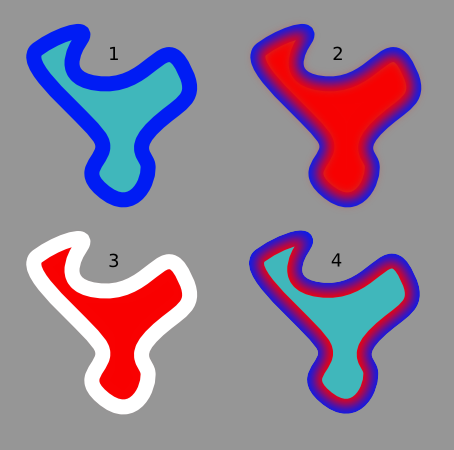
One of the limitations of the gradient tool, when applied to strokes, is that if you want the gradient to change from the inner edge to the outer, you can only do this for oval-shaped paths. The blur, together with masking, can fix this problem as well. First create the base path, then make a linked offset path for it, raise it to the top and set its fill to none and the stroke to the outer colour (1). Create another linked offset, raise it to the top and set its fill to the inner colour, stroke to none and blur it enough to create the stroke gradient (2). Group this path with the one created in step 1. Create yet another linked offset path with no fill, and the same stroke width that the one in step 1, but with white colour (3) If you want to use a stroke style (dotted line etc.) set it for this path. Use the white stroked path as a mask for the group created earlier. Now you have a stroke with a gradient, and mostly it behaves like an ordinary stroke — edit the nodes of the base path, and the stroke changes with it. Even path operations work, as long as they produce only one path (if they produce several, the gradient stroke is only applied to the topmost one). | One of the limitations of the gradient tool, when applied to strokes, is that if you want the gradient to change from the inner edge to the outer, you can only do this for oval-shaped paths. The blur, together with masking, can fix this problem as well. First create the base path, then make a linked offset path for it, raise it to the top and set its fill to none and the stroke to the outer colour (1). Create another linked offset, raise it to the top and set its fill to the inner colour, stroke to none and blur it enough to create the stroke gradient (2). Group this path with the one created in step 1. Create yet another linked offset path with no fill, and the same stroke width that the one in step 1, but with white colour (3) If you want to use a stroke style (dotted line etc.) set it for this path. Use the white stroked path as a mask for the group created earlier. Now you have a stroke with a gradient, and mostly it behaves like an ordinary stroke — edit the nodes of the base path, and the stroke changes with it. Even path operations work, as long as they produce only one path (if they produce several, the gradient stroke is only applied to the topmost one). | ||
| − | http:// | + | http://wesnoth.org/wiki-images/gradients-gaussian/tutorial4.png |
[[Category: Art Tutorials]] | [[Category: Art Tutorials]] | ||
Latest revision as of 08:23, 8 April 2014
Note: This tutorial was written for Inkscape, but should be applicable for other vector drawing programs with similar functionality.
The gradient tool in Inkscape is incredibly useful, but it has its limitations as well. For example, the radial gradient is limited to circular or oval in shape. To make gradients of other shapes, the Gaussian blur tool becomes handy. When you blur any object different in colour than its background, you are essentially creating a shaped gradient between those colours.
To make a "radial" gradient of any shape, that is, a gradient that changes from the edge of the path toward the centre, first create the path and set its fill colour to what you want the outer colour to be. Then make "Path -> Linked Offset", raise it to the top and set it to the inner colour (or usually somewhat more saturated one, to compensate the mixing when blurred). Use the node handle to make it smaller than the original path (1) and blur it to create the gradient (2). Because the inner path is linked to the outer one, any changes to the outer path will be updated in the shape of the inner one (though you may need to readjust the blur radius if you change the shape radically). To make multi-stop gradient, simply make several linked offsets of different colours and sizes (3). You will notice that the colour transition is smoother (rounder) than in normal gradients. If you need more linear gradient, you need to make several intermediary (in size and colour) linked offset paths.

The same method is good for making any odd-shaped gradients. Just create a stepwise gradient with several paths and blur them to make the gradient smooth. In the image below there is a stepwise gradient created with the interpolate effect (this effect is especially handy for this, because it can interpolate the colour as well). In the lower image all but the outermost path have been blurred.

One of the limitations of the gradient tool, when applied to strokes, is that if you want the gradient to change from the inner edge to the outer, you can only do this for oval-shaped paths. The blur, together with masking, can fix this problem as well. First create the base path, then make a linked offset path for it, raise it to the top and set its fill to none and the stroke to the outer colour (1). Create another linked offset, raise it to the top and set its fill to the inner colour, stroke to none and blur it enough to create the stroke gradient (2). Group this path with the one created in step 1. Create yet another linked offset path with no fill, and the same stroke width that the one in step 1, but with white colour (3) If you want to use a stroke style (dotted line etc.) set it for this path. Use the white stroked path as a mask for the group created earlier. Now you have a stroke with a gradient, and mostly it behaves like an ordinary stroke — edit the nodes of the base path, and the stroke changes with it. Even path operations work, as long as they produce only one path (if they produce several, the gradient stroke is only applied to the topmost one).
