Difference between revisions of "Authoring tools"
(Document smart insertion.) |
(→trackplacer: Remove the tool's documentation, leaving the file format) |
||
| (16 intermediate revisions by 7 users not shown) | |||
| Line 1: | Line 1: | ||
| − | This page collects information about tools in the Wesnoth source tree that are intended to help you write campaign WML. | + | This page collects information about tools in the Wesnoth source tree that are intended to help you write campaign WML. |
| − | == | + | == tmx_trackplacer == |
| − | ''' | + | {{DevFeature1.15|3}} '''tmx_trackplacer''' is a tool for editing journey tracks - the sequences of dots, crossed-sword, and flag symbols (track markers) that march across the story screens at the beginning of many Wesnoth scenarios. |
| − | + | You'll need Tiled, a GPLv2 map editor: | |
| + | * Debian / Ubuntu: install the "tiled" package | ||
| + | * other platforms: https://www.mapeditor.org/ | ||
| + | * these instructions were written with version 1.2.4 | ||
| − | + | === Usage === | |
| − | + | Assume the campaign that we want to make a map for is Story of Wose, which is set on the Green Isle. Start by putting a copy of the map in the campaign: | |
| − | + | mkdir Story_of_Wose/images/maps | |
| + | cp WESNOTH_DIR/data/campaigns/The_Rise_Of_Wesnoth/images/maps/green_isle.png Story_of_Wose/images/maps/ | ||
| − | + | Create a template .tmx file with the tool: | |
| − | + | WESNOTH_DIR/data/tools/tmx_trackplacer Story_of_Wose/images/maps/green_isle.png -o temp.tmx | |
| − | + | === In Tiled === | |
| − | + | Start Tiled with the temp.tmx file. Expect to see the Green Isle map. On the right hand side of the screen there should be two windows: | |
| + | * in the top, tabs ''Minimap'', ''Objects'' and ''Layers''. The Layers tab will have only ''background''. | ||
| + | * in the bottom, tabs ''Terrains'' and ''Tilesets''. The Tilesets tab should have ''wesnoth journey icons'' with the red dot, battle and rest markers. | ||
| + | https://user-images.githubusercontent.com/101462/66930950-ac876c80-f035-11e9-9599-d5dc4301acf2.png | ||
| − | + | In Layers, create a ''New Layer'' of type ''Object Layer''. A typical name for this layer is '''JOURNEY'''. Ensure that this layer is selected. | |
| + | From the menu bar at the top, select ''Insert Tile''. | ||
| + | From the Tilesets tab, choose dots, battles or rests, and click on the map to add them. The first two items placed will define the start of the journey; every item placed after the first two will be inserted in to the sequence based on whether it appears to be at the end or in the middle. | ||
| − | There will be a final macro '''JOURNEY_COMPLETE''' that displays the entire track in the 'old' color. This will be useful | + | For Story of Wose, the journey doubles back on itself. For this we'll split the journey in to two parts - rename '''JOURNEY''' to '''JOURNEY_PART1''', and add a new layer '''JOURNEY_PART2'''. You can use the opacity control at the top of the layers window to see what's on each layer. |
| + | |||
| + | '''JOURNEY_PART1''' starts with a battle, and ends with a battle: | ||
| + | https://user-images.githubusercontent.com/101462/66930947-abeed600-f035-11e9-89e8-efde15f2a48d.png | ||
| + | |||
| + | '''JOURNEY_PART2''' starts with dots, has a battle and then ends with another battle: | ||
| + | https://user-images.githubusercontent.com/101462/66930949-abeed600-f035-11e9-86a0-18c90c151c76.png | ||
| + | |||
| + | Save the .tmx file. | ||
| + | |||
| + | === Creating the .cfg === | ||
| + | |||
| + | Convert the .tmx file to a .cfg file: | ||
| + | |||
| + | WESNOTH_DIR/data/tools/tmx_trackplacer temp.tmx -o Story_of_Wose/utils/bigmap.cfg | ||
| + | |||
| + | Expect to see: | ||
| + | |||
| + | Read data: <Journey based on map file 'Story_of_Wose/images/maps/green_isle.png', with tracks {JOURNEY_PART1,JOURNEY_PART2}> | ||
| + | Exporting as cfg | ||
| + | |||
| + | At the moment, tmx_trackplacer doesn't have a way to preview the animations, other than loading the .cfg with Wesnoth itself. For testing, let's put all of the journey in at the start of the first scenario, Story_of_Wose/scenarios/1_The_Oldwood.cfg | ||
| + | |||
| + | #define STORY_BACKGROUND | ||
| + | [background_layer] | ||
| + | image=maps/background.jpg | ||
| + | scale_vertically=yes | ||
| + | scale_horizontally=no | ||
| + | keep_aspect_ratio=yes | ||
| + | [/background_layer] | ||
| + | [background_layer] | ||
| + | image=maps/green_isle.png | ||
| + | scale_vertically=yes | ||
| + | scale_horizontally=no | ||
| + | keep_aspect_ratio=yes | ||
| + | base_layer=yes | ||
| + | [/background_layer] | ||
| + | #enddef | ||
| + | |||
| + | [story] | ||
| + | [part] | ||
| + | {STORY_BACKGROUND} | ||
| + | {JOURNEY_PART1_STAGE1} | ||
| + | [/part] | ||
| + | [part] | ||
| + | {STORY_BACKGROUND} | ||
| + | {JOURNEY_PART1_STAGE2} | ||
| + | [/part] | ||
| + | [part] | ||
| + | {STORY_BACKGROUND} | ||
| + | {JOURNEY_PART1_COMPLETE} | ||
| + | {JOURNEY_PART2_STAGE1} | ||
| + | [/part] | ||
| + | [part] | ||
| + | {STORY_BACKGROUND} | ||
| + | {JOURNEY_PART1_COMPLETE} | ||
| + | {JOURNEY_PART2_STAGE2} | ||
| + | [/part] | ||
| + | [part] | ||
| + | story= _ "Today I want to tell you another story, a mere footnote in the history books if it is even remembered at all." | ||
| + | |||
| + | This should now show at the start of the campaign. Remember to refresh Wesnoth's cache if it doesn't appear. | ||
| + | |||
| + | === Could this be integrated as a Tiled plugin? === | ||
| + | |||
| + | Yes it could. Implementing it as a file converter was the easier option for development, and the code is (hopefully) modular enough for reuse. | ||
| + | |||
| + | == trackviewer == | ||
| + | |||
| + | {{DevFeature1.15|3}} Map journey track animation preview tool, shows the journey without needing to start Wesnoth and refresh the cache. It’s a support program which assumes you’re either editing the .cfg file with a text editor or using Tiled with [[Authoring_tools#tmx_trackplacer|tmx_trackplacer]]; in other words, it's the part of the [[Authoring_tools#trackplacer|old trackplacer]] that wasn't covered by tmx_trackplacer. | ||
| + | |||
| + | At least on Linux you can have both Tiled and this open on the same file. Save the file in Tiled, alt+tab to this, and press enter to reload the file. | ||
| + | |||
| + | Keys: | ||
| + | * Escape quits | ||
| + | * Return or Enter reloads the .cfg or .tmx file, and restarts the animation | ||
| + | * Space pauses/unpauses | ||
| + | |||
| + | == trackplacer's bigmap.cfg files == | ||
| + | |||
| + | '''trackplacer''' was the original tool for creating the journey tracks, the sequences of dots, crossed-sword, and flag symbols (track markers) that march across the story screens at the beginning of many Wesnoth scenarios. The tool itself has been replaced by the others on this page, this section remains to document the file format used in bigmap.cfg files (the filename itself isn't important, but in mainline has standardised on that name). | ||
| + | |||
| + | To understand what your 'bigmap.cfg' does, you need to know that journey-track markers can be put on your story screens by two different sets of macros. One, used for 'new' marks, is displayed in color with quarter-second delays; the other, 'old' set displays marks in white with no delay. Your journey track is divided into stages by battle and rest markers; conventionally, you want to display the latest (most recent) stage with the new macros and all previous stages with the old ones. | ||
| + | |||
| + | Your track will be saved in .cfg format as a sequence of macro definitions with names like '''JOURNEY_STAGE_1''', '''JOURNEY_STAGE_2''' and so on. '''JOURNEY_STAGE_1''' will draw the first stage in the 'new' color parts. '''JOURNEY_STAGE_2''' will draw the first stage in the 'old' color and the second stage in the 'new' one; '''JOURNEY_STAGE_3''' will draw the first and second stages in the 'old' color parts and the third stage in the 'new' one; and so on. | ||
| + | |||
| + | There will be a final macro '''JOURNEY_COMPLETE''' that displays the entire track in the 'old' color. This will be useful when you are piecing together multiple tracks, say for a campaign with branches. | ||
| + | |||
| + | The track information in your bigmap.cfg will be enclosed in special comments | ||
| + | that look like this: | ||
| + | |||
| + | # trackplacer: tracks begin | ||
| + | # trackplacer: tracks end | ||
| + | |||
| + | '''trackplacer_tmx''' will not alter anything it finds outside these comments, and will always enclose everything it writes in them. | ||
Special comments may appear in your ''journey.cfg'', looking like this: | Special comments may appear in your ''journey.cfg'', looking like this: | ||
| Line 29: | Line 132: | ||
<tt># trackplacer: <property>=<value></tt> | <tt># trackplacer: <property>=<value></tt> | ||
| − | These set properties that ''' | + | These set properties that '''trackplacer_tmx''' may use. At present there is only one such property: <tt>map</tt>, which records the name of the mapfile on which your track is laid. Don't remove this comment, '''trackplacer_tmx''' needs it. |
| + | |||
| + | == Wesnoth Map Tracker == | ||
| + | A standalone free and open source GUI tool that is available from here: https://github.com/babaissarkar/WesnothMapTracker | ||
| − | + | It allows you to open an image file (say the Wesnoth Map) and place markers upon it, and the corresponding macro code is generated like this: | |
| + | <syntaxhighlight lang=wml> | ||
| + | {NEW_JOURNEY 455 300} | ||
| + | {NEW_REST 500 300} | ||
| + | </syntaxhighlight> | ||
| − | + | Note that it cannot generate a full map.cfg yet, just the part mentioned. For detailed instructions please visit the link above. | |
| − | + | [[Category:Tools]] | |
Latest revision as of 09:05, 9 January 2026
This page collects information about tools in the Wesnoth source tree that are intended to help you write campaign WML.
Contents
tmx_trackplacer
(Version 1.15.3 and later only) tmx_trackplacer is a tool for editing journey tracks - the sequences of dots, crossed-sword, and flag symbols (track markers) that march across the story screens at the beginning of many Wesnoth scenarios.
You'll need Tiled, a GPLv2 map editor:
- Debian / Ubuntu: install the "tiled" package
- other platforms: https://www.mapeditor.org/
- these instructions were written with version 1.2.4
Usage
Assume the campaign that we want to make a map for is Story of Wose, which is set on the Green Isle. Start by putting a copy of the map in the campaign:
   mkdir Story_of_Wose/images/maps
   cp WESNOTH_DIR/data/campaigns/The_Rise_Of_Wesnoth/images/maps/green_isle.png Story_of_Wose/images/maps/
Create a template .tmx file with the tool:
WESNOTH_DIR/data/tools/tmx_trackplacer Story_of_Wose/images/maps/green_isle.png -o temp.tmx
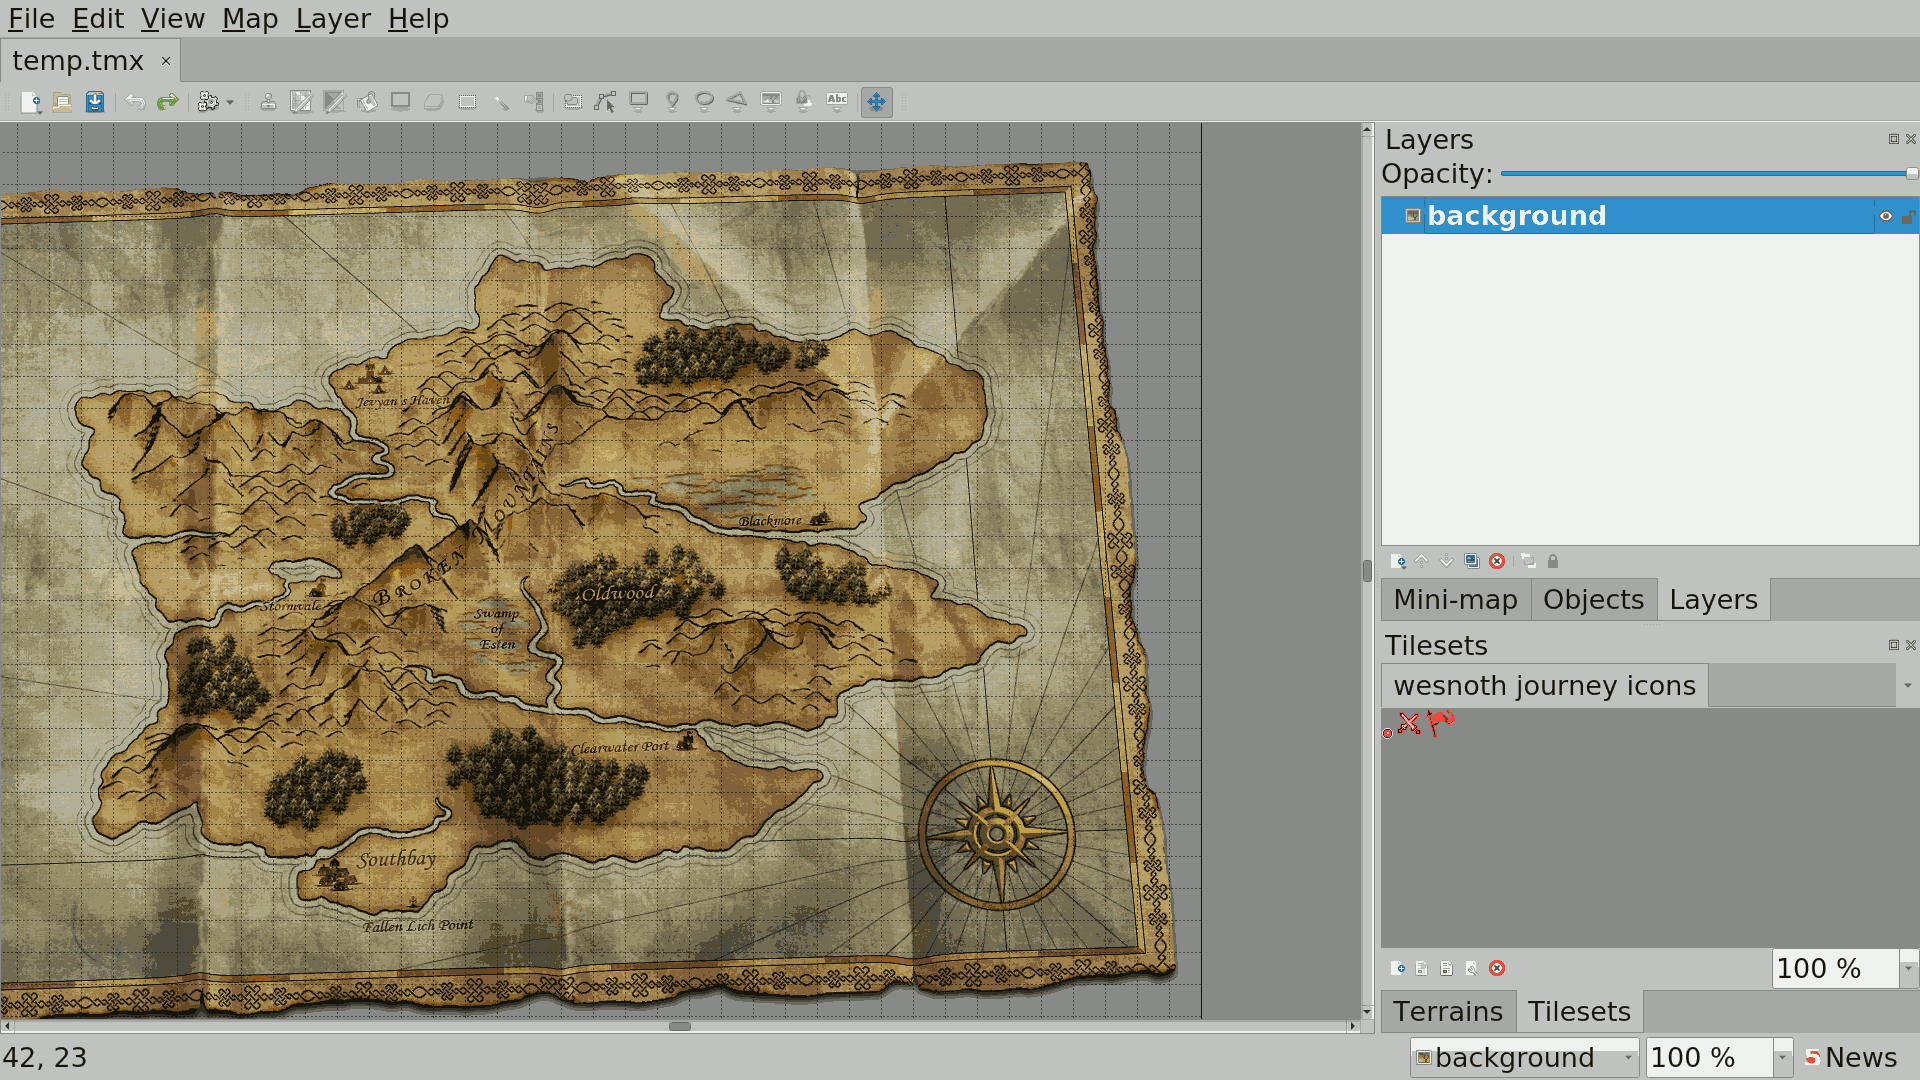
In Tiled
Start Tiled with the temp.tmx file. Expect to see the Green Isle map. On the right hand side of the screen there should be two windows:
- in the top, tabs Minimap, Objects and Layers. The Layers tab will have only background.
- in the bottom, tabs Terrains and Tilesets. The Tilesets tab should have wesnoth journey icons with the red dot, battle and rest markers.
In Layers, create a New Layer of type Object Layer. A typical name for this layer is JOURNEY. Ensure that this layer is selected. From the menu bar at the top, select Insert Tile. From the Tilesets tab, choose dots, battles or rests, and click on the map to add them. The first two items placed will define the start of the journey; every item placed after the first two will be inserted in to the sequence based on whether it appears to be at the end or in the middle.
For Story of Wose, the journey doubles back on itself. For this we'll split the journey in to two parts - rename JOURNEY to JOURNEY_PART1, and add a new layer JOURNEY_PART2. You can use the opacity control at the top of the layers window to see what's on each layer.
JOURNEY_PART1 starts with a battle, and ends with a battle:

JOURNEY_PART2 starts with dots, has a battle and then ends with another battle:

Save the .tmx file.
Creating the .cfg
Convert the .tmx file to a .cfg file:
WESNOTH_DIR/data/tools/tmx_trackplacer temp.tmx -o Story_of_Wose/utils/bigmap.cfg
Expect to see:
   Read data: <Journey based on map file 'Story_of_Wose/images/maps/green_isle.png', with tracks {JOURNEY_PART1,JOURNEY_PART2}>
   Exporting as cfg
At the moment, tmx_trackplacer doesn't have a way to preview the animations, other than loading the .cfg with Wesnoth itself. For testing, let's put all of the journey in at the start of the first scenario, Story_of_Wose/scenarios/1_The_Oldwood.cfg
   #define STORY_BACKGROUND
       [background_layer]
           image=maps/background.jpg
           scale_vertically=yes
           scale_horizontally=no
           keep_aspect_ratio=yes
       [/background_layer]
       [background_layer]
           image=maps/green_isle.png
           scale_vertically=yes
           scale_horizontally=no
           keep_aspect_ratio=yes
           base_layer=yes
       [/background_layer]
   #enddef
   [story]
       [part]
           {STORY_BACKGROUND}
           {JOURNEY_PART1_STAGE1}
       [/part]
       [part]
           {STORY_BACKGROUND}
           {JOURNEY_PART1_STAGE2}
       [/part]
       [part]
           {STORY_BACKGROUND}
           {JOURNEY_PART1_COMPLETE}
           {JOURNEY_PART2_STAGE1}
       [/part]
       [part]
           {STORY_BACKGROUND}
           {JOURNEY_PART1_COMPLETE}
           {JOURNEY_PART2_STAGE2}
       [/part]
       [part]
           story= _ "Today I want to tell you another story, a mere footnote in the history books if it is even remembered at all."
This should now show at the start of the campaign. Remember to refresh Wesnoth's cache if it doesn't appear.
Could this be integrated as a Tiled plugin?
Yes it could. Implementing it as a file converter was the easier option for development, and the code is (hopefully) modular enough for reuse.
trackviewer
(Version 1.15.3 and later only) Map journey track animation preview tool, shows the journey without needing to start Wesnoth and refresh the cache. It’s a support program which assumes you’re either editing the .cfg file with a text editor or using Tiled with tmx_trackplacer; in other words, it's the part of the old trackplacer that wasn't covered by tmx_trackplacer.
At least on Linux you can have both Tiled and this open on the same file. Save the file in Tiled, alt+tab to this, and press enter to reload the file.
Keys:
- Escape quits
- Return or Enter reloads the .cfg or .tmx file, and restarts the animation
- Space pauses/unpauses
trackplacer's bigmap.cfg files
trackplacer was the original tool for creating the journey tracks, the sequences of dots, crossed-sword, and flag symbols (track markers) that march across the story screens at the beginning of many Wesnoth scenarios. The tool itself has been replaced by the others on this page, this section remains to document the file format used in bigmap.cfg files (the filename itself isn't important, but in mainline has standardised on that name).
To understand what your 'bigmap.cfg' does, you need to know that journey-track markers can be put on your story screens by two different sets of macros. One, used for 'new' marks, is displayed in color with quarter-second delays; the other, 'old' set displays marks in white with no delay. Your journey track is divided into stages by battle and rest markers; conventionally, you want to display the latest (most recent) stage with the new macros and all previous stages with the old ones.
Your track will be saved in .cfg format as a sequence of macro definitions with names like JOURNEY_STAGE_1, JOURNEY_STAGE_2 and so on. JOURNEY_STAGE_1 will draw the first stage in the 'new' color parts. JOURNEY_STAGE_2 will draw the first stage in the 'old' color and the second stage in the 'new' one; JOURNEY_STAGE_3 will draw the first and second stages in the 'old' color parts and the third stage in the 'new' one; and so on.
There will be a final macro JOURNEY_COMPLETE that displays the entire track in the 'old' color. This will be useful when you are piecing together multiple tracks, say for a campaign with branches.
The track information in your bigmap.cfg will be enclosed in special comments that look like this:
   # trackplacer: tracks begin
   # trackplacer: tracks end
trackplacer_tmx will not alter anything it finds outside these comments, and will always enclose everything it writes in them.
Special comments may appear in your journey.cfg, looking like this:
# trackplacer: <property>=<value>
These set properties that trackplacer_tmx may use. At present there is only one such property: map, which records the name of the mapfile on which your track is laid. Don't remove this comment, trackplacer_tmx needs it.
Wesnoth Map Tracker
A standalone free and open source GUI tool that is available from here: https://github.com/babaissarkar/WesnothMapTracker
It allows you to open an image file (say the Wesnoth Map) and place markers upon it, and the corresponding macro code is generated like this:
  {NEW_JOURNEY 455 300}
  {NEW_REST 500 300}
Note that it cannot generate a full map.cfg yet, just the part mentioned. For detailed instructions please visit the link above.